 by
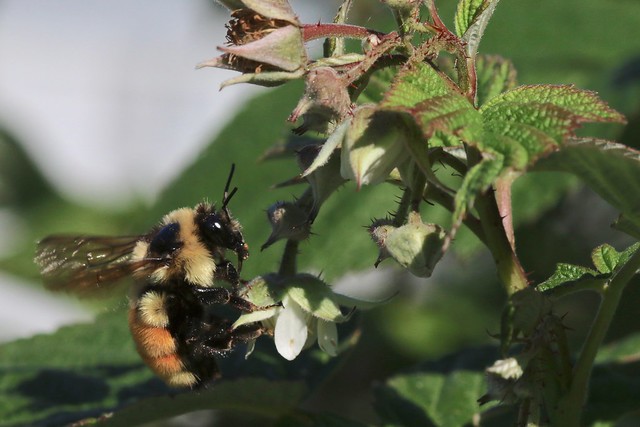
by Most biologists are excited to share the animals they study with a broad audience. One of the challenges of that engagement is having compelling photographs of your subjects. Over the last several years, I’ve really enjoyed trying to take better pictures. In part, this serves our lab’s research goals. We routinely image insects in the lab, and good photographic methods help ensure reliable data. But it’s also wonderful to have images of the animals in the field that get people’s attention. Everyone what’s to see these animals in their natural environment!
This post is based on a guide I wrote for our lab, originally posted to HackMD in 2018.
This is a quick guide to photography, focused on taking pictures of insects in the wild. These notes are based on several years of trial-and-error experience, as well as advice from Bill Graham, retired professor of photography from Endicott College, and a June 2018 workshop by Bryan Pfeiffer, wildlife photographer at the University of Vermont with an interest in butterflies. These principles apply broadly to all sorts of insect and wildlife photography.
The animals
Get to know your subjects! Where can you find them? What times of day or night are they out and available to photograph? Are they easily spooked by your footsteps or your shadow? If they do notice you and take flight, how fast and how far do they tend do go? Can you catch them in a net, vial, or Petri dish to make photography easier or more consistent? Find some good guide books on the group of animals you’re after, and read up on them.
Camera basics
Get to know your camera! You can shoot insects with a good point-and-shoot camera in Macro mode or a cell phone, but you’ll have the best results using a digital SLR camera. You’ll also improve your ability to get good pictures under diverse conditions if you understand how your camera works and how to use it in manual mode.
Digital cameras work by focusing light through the lens onto photosensors that register the color and intensity of the light across a grid of sensors. These ultimately become the pixels in your image file.
There are three critical parameters that effect the function of the camera as it takes a picture: shuttle speed, aperture, and ISO. Even if you’re in auto mode, you should be able to find information on your camera’s current settings in a screen similar to the one below.

Shutter speed
The camera’s shutter blocks light from the lens reaching the sensors. It opens to take a picture for a set length of time, usually a faction of a second. In the image above, this camera is set to a shutter speed of 1/4000 of a second. Some camera omit the “1/” numerator and just display the fraction-of-a-second speed.
Shutter speed is important in wildlife photography because animals move! If you want to “freeze” fast movement, you must use a fast shutter speed. It’s advisable to use at least a speed of 1/250 just to eliminate the vibration from your hand as you hold the camera, but for most insect macro photography 1/1000 or 1/2000 should be a minimum speed.
Of course, faster shutter speeds let less light into the camera, and you can’t take pictures without light.
Aperture
The camera’s aperture is like the iris of your eye. It controls how much light is admitted to the lens. Most cameras describe the aperture size with an f-stop number. On the camera shown above it’s f/5.6. Lower f-stops are larger openings, letting in more light. So using a lower f-stop means you can use faster shutter speeds.

If you take a picture at 1/4000 and f/5.6, the sensor will receive the same amount of light as if you were to take it at 1/2000 (slower, admitting more light) and f/8 (a smaller opening, admitting less light). The difference between these two settings will be in the depth of field. With larger f-stops (f/5.6 rather than f/8) a smaller range of distances will be in focus. With smaller f-stops, more of the foreground and background will appear sharp.
ISO
ISO is a third parameter that sets your camera’s sensitivity to light. Back in the days of film photography, different chemical preparations made film with greater and lesser sensitivity. This property was described by an ISO number. Higher ISO value film could produce an image in lower light. The draw-back was that high ISO film produced a grainy image. Digital cameras work on a different physical-chemical basis, but manufacturers have kept the term ISO as a way to describe the setting of the camera’s sensitivity. Similar to film, high ISO values on a digital camera lead to graininess or noise in the resulting images.
The interaction of shutter speed, aperture and ISO are diagrammed in the triangle below.
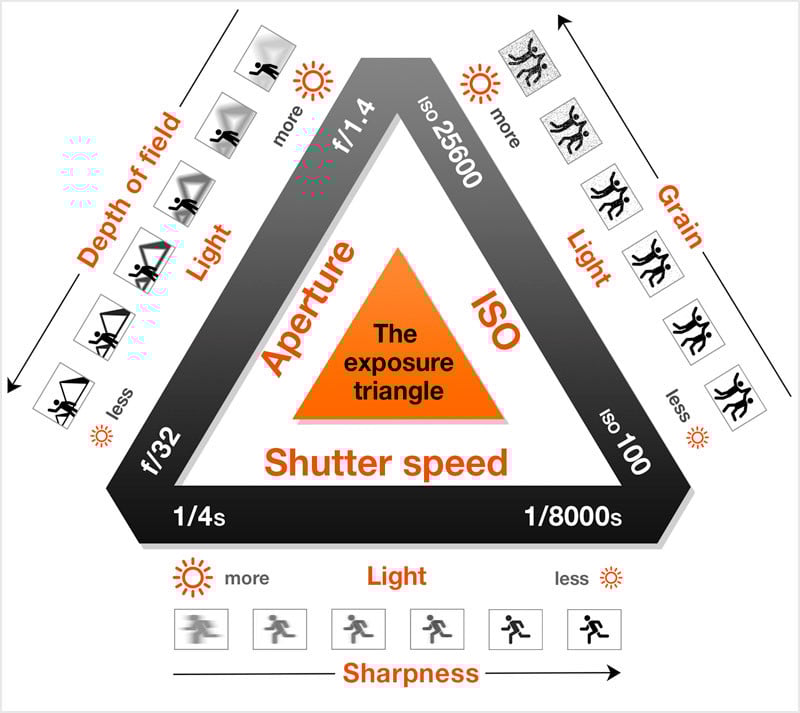
In general, it’s useful while shooting to choose an aperture, then an ISO, and let shutter speed vary to a degree, trying to keep it fast enough to freeze movement. If you have a flash, it can also be used, allowing you to set the shutter speed yourself as well.
Camera modes
Most cameras have a setting wheel that offers varying levels of control over shutter speed and aperture. ISO is typically adjustable elsewhere on the camera, and you may need to search for how to adjust it.

In full auto mode, the camera’s computer will read the light level (and perhaps the distance of objects in its view) and make a guess at the shutter speed and aperture that are appropriate. Many modern cameras make good guesses, but they are not suited for rapidly moving targets, even in “sport mode”. Program mode (P) is similar to auto, except that it usually prevents the camera from activating flash.
Manual exposure mode (M) allows you to set shutter speed and aperture individually. How do you know what settings to use? Knowing how shutter speed, aperture and ISO will affect your resulting image will give you ball park ideas of the settings you need. Your camera’s view finder should also include a light meter, similar to the one cartooned below.
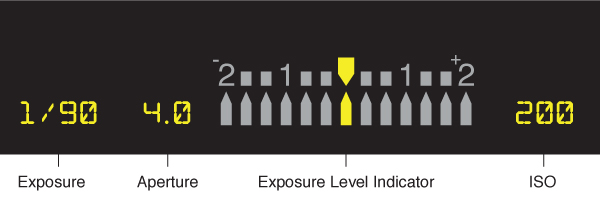
If the settings admit less light than the camera thinks necessary for a properly exposed image, the highlighted needle will move left. Settings that may result in over-exposure will move the needle right. Of course you’re at liberty to ignore the camera’s advice if you want an image that’s darker or brighter.
The light meter is based on the amount of light coming through the lens to a sensor. The needle or highlight in the view screen will be centered if the shuttle speed, aperture and ISO you (or the camera) have set will result in a medium gray image.

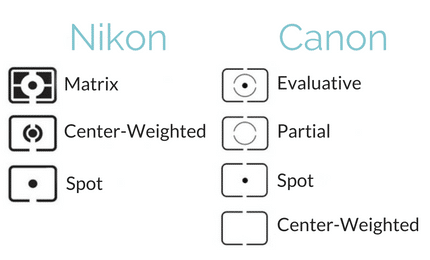
Most digital SLRs can be set to take a light meter reading in different ways. It can average values from the entire field of view or focus in on a spot the center. When taking pictures of animals in the field, it’s rare that you can fill the field of view with your subject. For that reason, setting your camera to spot metering mode is often helpful. But remember that the meter will give you information based on what’s currently in its line-of-sight.
If you stay with a wider metering mode, avoid having especially bright or dark backgrounds in the view when choosing exposure settings. For example, don’t have a bright sky in the background.
Your camera will also have two “priority modes”, in which you determine either shutter speed or aperture, and the camera picks the other value to produce an image with balanced exposure.
Aperture priority (Av) is a convenient way for you to choose the f-stop you want for a depth-of-field, without worrying about the specific shutter speed. This is the mode in which many seasoned photographers will shoot, if they’re not using manual. By controlling depth-of-field you can exclude busy or distracting backgrounds.
Photographing insects
Taking pictures of insects presents some unique challenges that lead to particular strategies.
- use shutter speed to stop motion blur
- shoot with an awareness of depth-of-field
- add as much light as you can
- be intentional about composition
I’ll expand those points below.
Aperture, ISO, shutter speed
Consider your settings is that order: aperture, ISO, shutter speed. The full auto or program modes will make too many assumptions, and you’ll want more control than they offer. Aperture-priority mode allows you to set an f-stop for a depth-of-field appropriate to your subject. Since depth-of-field will be limited for most macro photography distances, you may as well use a low f-stop (an “open” lens) to let in more light. But if possible, you can experiment with closing it down (using a higher f-stop).
Even if you shoot in aperture-priority, pay attention to the shutter speed. The rule of thumb is that the shutter speed should be at least 3 times the focal length of the lens, even for stationary subjects. So, for a 100mm lens, that’s at least 1/300. But for animals (and even plants that might move in the wind) you’ll probably need a shutter speed of 1/1000 to 1/4000.
If you’re using flash (see below) you can shoot in manual mode, and choose the shutter speed and aperture that you want, allowing flash (and perhaps also ISO) to make the image properly exposed.
Be aware of depth of field
While depth-of-field may never be great for macro subjects, it makes focus very important. If your camera’s and lens’ auto focus is relatively fast, use it. However for some lenses, or in low light, manual focus may be more effective. If you can get away with it – for example under bright sun – stop down the aperture to gain some depth of field. But be aware of the background. If it’s too distracting, keep a relatively open aperture to create a blurred background. Or just move yourself so the background is different.
Be aware of the orientation of your subject to the lens. A butterfly that has its wing surface face-on to your lens will be entirely in the focal plane, allowing your to use a lower f-stop (more open aperture).
Distance to your subject also increases the depth of field. If you’re far from your target, as with birds and many butterflies (which spook easily), you can use lower f-stops, letting in more light.
Take lots of images
Set your camera to take rapid-fire images. You want to freeze movement with a fast shutter speed, but the animal may be in unattractive or uninformative positions much of the time. The solution is to just take lots of images rapidly! The caveat is that you’ll want to delete the bad ones later.
Use a flash to freeze motion
Use a Speedlite or similar style flash with eTTL metering. This will allow you to shoot in manual mode, setting the shutter speed (to something fast) and aperture (to determine the depth of field) of your choice.

Flash can have a couple of limitations. First, it will not work on distant subjects. You cannot rely on flash if you’re photographing birds in the wild. If you’re too close to the subject, the intensity of the flash may burn out the image. It’s often helpful to adjust the flash compensation ![]() down by 1 to 2 stops.
down by 1 to 2 stops.
Another problem is that a flash takes time to recharge before it can fire again. So it may not be possible to shoot with a high frame rate, since the flash may only fire for the first image.
Some flashes will also not work with fast shutter speeds. The typical cut-off is 1/250, which is not very fast for insects. If your flash allows high speed sync, turn it on, and you should be able to use it with faster speeds up to the 1/1000’s. It’s denoted by an icon of a lighting bolt and the letter H, ![]() . Sadly, this feature is often limited to pricier models, such as the Canon Speedlite.
. Sadly, this feature is often limited to pricier models, such as the Canon Speedlite.
Lastly, flash can change the aesthetics of an image. When it is intense, flash can make a scene look flat and 2-dimensional. Ideally, you want just enough flash to supplement natural light, although this can be very hard to accomplish given the demands of photographing small, fast, dark bees in low light!
Use the highest ISO you can live with
The factory setting for ISO on most cameras is 100, but they can be set to very high ISO. For Canon cameras ISO above 640 begin to produce visible graininess. I also think the color becomes strangely saturated at ISO 800 and above. If you’re trying to get beautiful pictures, a low ISO will ensure smooth, low-grain images, if you can exposure things right and keep your subject from creating motion blur.

But, if you’re struggling in low light to document an insect, go to a high ISO rather than miss the image.
Think about the composition of the image
Even if you’re just shooting a voucher image to document the presence of an animal, think about the image you are creating as an aesthetic product. Personal taste will be a factor here, but whatever your preferences, just thinking about what “looks good” will certainly help you produce better photographs.
If you’re shooting to document the animal, make your subject take up most of the image. Don’t just rely on high-resolution to enable you to crop in.
For shots that are meant to be more evocative than something purely documentary, these consideration become even more important. In this case, leave a little extra space around your subject so that you can rotate and crop in post-processing. Remember the rule of thirds, which says images are more pleasing if subjects lie alone lines dividing the image into thirds.
Of course, rules are meant to be broken. So use your best judgment. Sometimes it can interesting if the subject is echoed by lines or shapes elsewhere in the image. But avoid overly distracting backgrounds.
Also, it can helpful to pay attention to color. How does the background color complement the subject?
Take a few test images and reconsider
When you first come upon a subject, make your best guess at the exposure settings, flash and composition options available to you. Often you have to think fast! But if you can, look at the resulting image and reconsider…
- should you change the shutter speed to freeze motion more?
- adjust the aperture to change depth-of-field?
- move ISO up to deal with low light? or down to limit grain?
- use more flash to provide light? or less to avoid burn-out?
- does the composition of the image record the features of the animal you need to identify it? and is it aesthetically pleasing?
Make and changes you think are best and then fire away, taking images until you’re satisfied that you’ve got what you need.
Lenses
Depending on the critters you’re hunting, many different lenses may work. However, the favorites have intermediate magnification and focal distances. Some examples for Canon cameras…
- EF-S 60mm f/2.8 Macro USM
- EF 100mm f/2.8 Macro USM – My personal favorite
- EF 180mm f/3.5L Macro USM

Fixed focal length lenses are typically preferable to zoom lenses because the optics are optimized for a particular distance and they are generally more solid. Image stabilized (IS) lenses also help limit motion blur.
Image files
For most applications, have your camera save images in the highest quality JPEG format. Professional photographers prefer to use RAW format, which applies the least compression or alteration of the image and allows them greatest ability to manipulate the image later. However, RAW files are significantly larger than even high-quality JPEG’s.
Post-processing
Most professional photographers will process images using software such as Adobe Lightroom or Photoshop. Typically manipulations include rotation and cropping, as well as adjustment of light levels. Photographers and biologists debate the ethics of more intensive adjustments such as removing dust or distracting background and altering the proportions of the subject in whole or in part. Most scientific publications have policies that forbid photographic manipulations that are applied to only one part of an image. So, cropping, rotation and light-level adjustment are okay, but local touch-up’s are not.
Practice!
Everything gets better with practice!
Additional stuff
- The Complete Guide to Macro Photography: 137 Tips
- Tips for Photographing Bees from Bumble Bee Watch
- Little Things Matter, a story about Bowdoin College alum, entomologist, and photographer Alex Wild
- The Entomological Society of America‘s annual Insects of the World calendar photo contest
- Dave’s Flickr page